
A PI Resource Extraction Primer
When running PI, there are a few things you should ask yourself before starting:
• How often will I update planets?
• How much logistical work will I do?
• How much balancing, tweaking and adjusting will I do?
I have found that in order to keep up with my PI, I try to make sure I spend no more than 15-20 minutes every other day. This guide is built for that approach. This has been able to consistently produce about 800m-1b isk per month for the equivalent of 5 hours of work, across three characters. That’s 160m per hour. I think that is reasonable. You can make more by spending more time on PI, and you can make less by spending less time on PI. I think the high range, with one account using three pilots, is about 1.5b per month. But that is only for the most intense. Here, I am going to go more in depth than previous posts about how to hit the middle mark.
First, there are a few things you need to know about PI:
• R0 harvesting is non-constant, starting high and tapering down regardless of cycle length.
• P1+ processing is constant.
• Any excess PI product fed into a facility is destroyed.
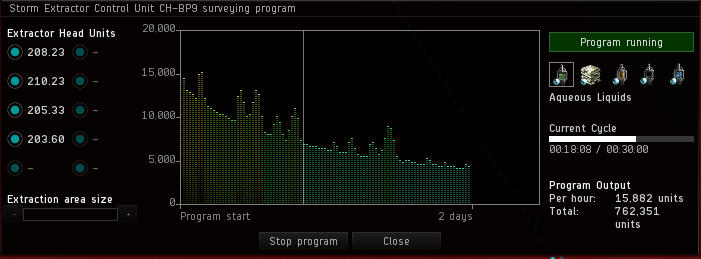
• The amounts harvested in the ECU pane are incorrect (the data shown in the Scan Overlay and ECU window is based on your Planetology skills, not what is actually present).
This means you always want to build in buffers for ECUs, and time your processing over the entire cycle length, not any particular time within the cycle. When you combine the above four points, in the majority of cases you are best served dividing your planets between harvesting and converting.
Basics
Ok, let’s talk some very basic stuff. How do you make PI products?
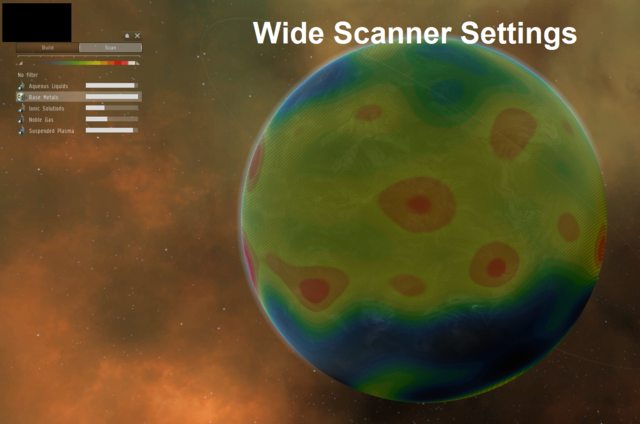
You start by building a command center on a planet. You do this by putting one in a cargo hold, then finding a planet that matches the type, and however you get to that planet via the interface, click on “View in Planet Mode”. Then you build a command center, which consumes the one in your hold. Probably you want to use the scanner first, to find the PI goo you want, and put your command center near the hotspots. This is because when you open a planet after placing a command center, the view will zoom to the command center.
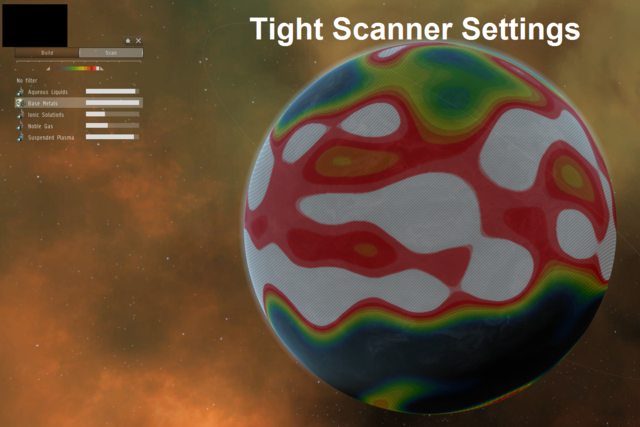
Each planet has 5 types of goo, and each planet type is generally better or worse for certain types of goo. You can see the concentrations/hotspots using the slider in Scan Mode. It uses a heat map approach, with red and white being the best locations. The heat map you see is influenced by your Planetology and Advanced Planetology skills. Each increasing level improves the accuracy of your heat map. I recommend at least Planetology 3, past that is personal preference. Another thing to note is that in WH space, if you do not adjust the slider, the whole planet may be white, or light green. I like to set the slider ends at about 25% and 75% in order to get a useful contrast in the heat map.
Once you Command Center is down, you’ll want to submit that build, and maybe upgrade it as high as you can and submit again, because the interface only allows you to place stuff you have the CPU and Powergrid for. Go go Eve! In general, you want Command Center Upgrades to level 4. Anything less is leaving a lot on the table. It is also a relatively short train.
After that, you can to put down an Extractor Control Unit (ECU), probably near what you want to harvest. Then you can go into the ECU, and play with the PI good you want and the number of Extractor Heads and Head placement. You’ll notice the curve in this window starts high, and decreases over time. This is what I mean when I say extraction of R0s is non-constant.
The extraction curve:
Another note: If you route a harvester into basic factory, any excess R0s will disappear into the ether. The same goes for any facility receiving goods, if it is full you will lose the extra items. Never oversupply! There are two ways to handle this. The easiest is to always route ROs into a Storage facility, then route into a factory. After that, you can manage how much gets sent on down the chain so that you always supply just what you need to, no more, no less.
Once you set that up, you’ll need to convert your R0s, the raw planet goo, into something smaller and more valuable. If you just try to move R0s, you will fill freighters. Converting this stuff both shrinks it and makes it more useful, until you are running P3>P4. Also, there is generally a value-add at each level of conversion. Here is the general progression:
• 3000 R0 = 20 P1, 30 min at a Basic Industrial Facility, also called a BIF or basic factory.
• 2x 40 P1 = 5 P2, 1 hour at a Advanced Industrial Facility, AIF or advanced factory
• 2x or 3x 10 P2 = 3 P3, 1 hour at an AIF
• (2x 6 P3 and 40 P1) or (3x 6 P3) = 1 P4, 1 hour at High Tech Facility
As you can see, it gets complicated at the final stage. There is also a doubling effect from the top down. It takes two times as many of each lower tier factory/good to make enough goods to supply a higher tier factory.
Harvesting v Processing Planets
Each planet can only hold so many facilities. This leads to an invisible line where you lose out on your planet’s capacity for exploitation as either a harvesting planet or a factory planet. You either have too many ECU extractor heads, which feed excess R0 into a full connection and functionally destroy the excess R0. Or you have too many factories, and you cannot run them to capacity, therefore you are wasting fitting space on an idle factory. In the worst case, you fail in all areas, failing to support a factory, losing overflow materials, and you have to micromanage anyway! The invisible line that will help you determine this is your CCU level, and how you set up your planets.
At CCU 4, after you take links into account, you appear to have two “good” options for harvesting planets:
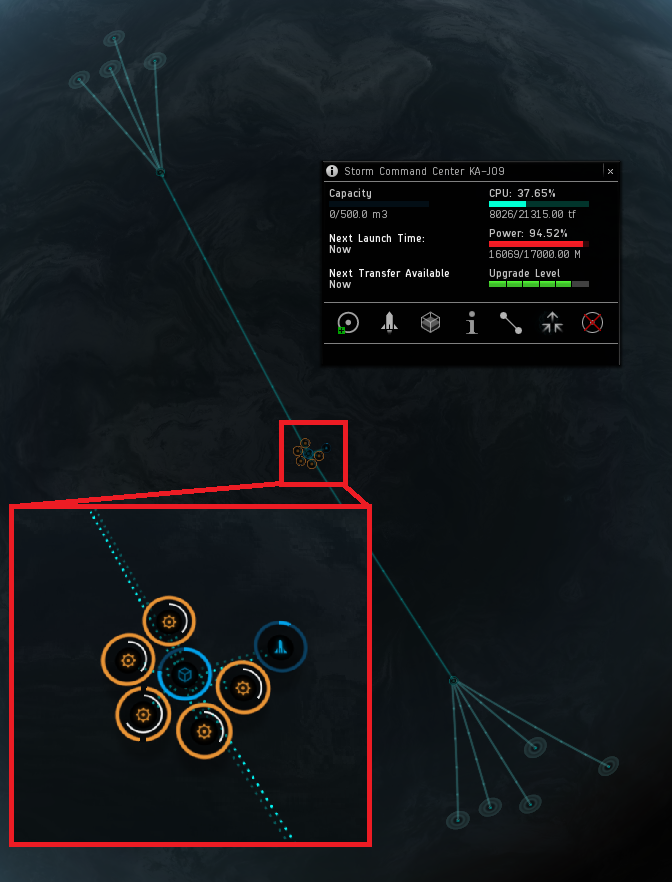
The Stripmine (P1 Production)
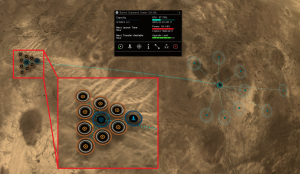 Run one ECU with 9-10 heads, feeding a storage unit, storage feeding factories, factories feeding your launchpad. This maximizes your utilization of extracted ROs, and buffers your R0s early on. This seems to lead to a pile of excess R0s early in your cycle, but as your harvesters taper off your factories continue chewing through the initial oversupply. You are not losing resources, you have buffer at the storage unit for R0s and for P1s at the launchpad. Finally, you are maximizing your fitting space on the planet by fully exploiting the R0s you harvest. On smaller planets you can snake an ECU with 9-10 heads nearly halfway around the whole thing, so you can adapt to moving hotspots.
The Dumbbell (P2 Production)
This runs two ECUs, each into two basic factories, then run those P1 goods into an advanced factory to make P2s. The dumbbell name comes from what this setup sort of looks like on most planets. At CCU 4, this will barely fit if you include a storage buffer and launchpad. You will not have PG/CPU to move your ECUs very far. You will likely have unbalanced extractor heads (4 on one ECU, 5 on another), and wildly unbalanced R0 production. If you fit a buffer storage unit for R0s and one ECU ends up producing too much, you fill your storage and you start to lose everything from both ECUs, and therefore your chain is dead, and you have to deal with a silo full of R0s.
In other words, halfway through your cycle you may start losing everything, you need to adjust your factories and routes to convert excess R0s, and you lose time in producing the right items for further along in the chain. If you feed straight into factories, anything past 3000 R0 per basic factory per half hour is utterly wasted. There are multiple failure points in this setup with CCU 4. The advantage of seemingly simple logistics is crippled by requiring tedious micromanagement of your ECUs and factories, and splitting grid between two resources and the attendant processing facilities. You harvest less and convert less.
Note that if you have CCU 5, this setup can work in some cases, but it still requires a hell of a lot of micromanaging, and you are still likely wasting planet space on factories better located on a factory planet. In short, you are crippling your resource extraction even with CCU 5.
The Low Effort Way
Skills: CCU 4, ICC 4
This format uses two day cycles and five planets per pilot. Four stripmine planets each harvest 1 R0 and convert it to a P1, and the fifth planet converts these P1s into a P3. You expand across pilots as they get up to skill, and you rebalance your P1s as needed to keep your factory planet running. In WH and 0.0 space, four planets producing P1s will just about keep pace with a single factory planet with four P3 lines running. I like to run the lines in two sets of two with their own Launchpads, as it makes balancing easy, and makes troubleshooting errors a little bit easier. It also lets you import every two days, as opposed to having to import once a day, because you have twice the storage. If you play every day, you can forgo this dual launchpad approach.
This process also scales across the number of pilots you have. For each pilot with CCU 4 and ICC 4, you get five planets. If you plan your PI products, you can simply balance the outputs of your P1 planets across all the P3 factories. If one resource is over or under producing, changing one or two planets is relatively simple. Alternatively, you can use the extra planets to have two characters running different P3 chains, and use the third pilot to get what you need for one of the P3/P3/P1 P4s. In that case you pick up any short goods for your other two P3 lines, get the P1 you need, and run the P4 factory planet.
P3 Factory Planet:
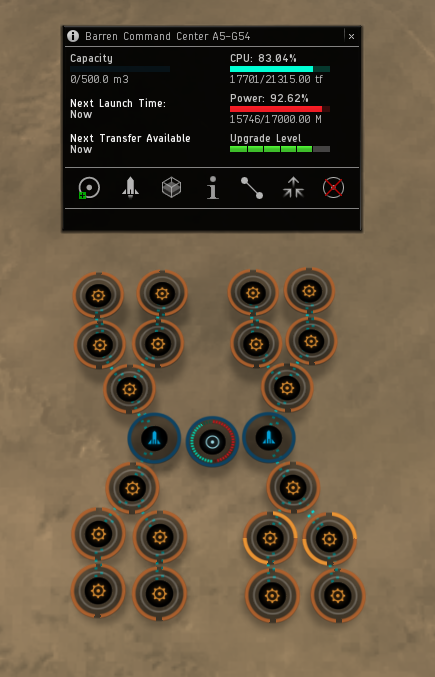
For fuel production, I can build one factory planet with two P2 lines and one P3 line, and funnel everything into the correct launchpads. As long as the inputs are balanced within one line, there is no tweaking. Just pick up your goods, and dump them at the next planet! I could try to set up a perfectly tailored fuel production chain, but look at this and tell me if you want to try to perfectly balance that.
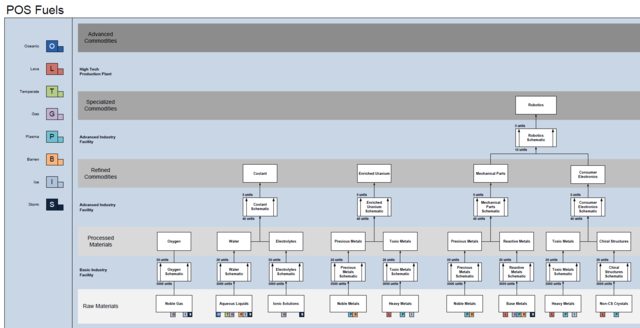
For higher tier PI production, this means you can trade or sell PI goods to someone running a complex P4 without having to worry much about the specifics, and the higher tier producer can just manage ratios. Excess goods can be balanced out or sold off, and the minutiae of tweaking various setups each day and keeping balances in proportion is reduced to simply switching the R0 harvested and P1 produced for a few days or weeks.
In the end, after your initial setup, managing PI should take about as long as it takes you to warp to your POCOs and pick up goods every two days or so, with an extra pit stop to balance the goods ratio and take a trip to your factory planet if you go that route. You can get it down to a minute or so a planet, warp time and all!